LAMP とは、Linux、Apache HTTP Server、MySQL、PHP(またはPerl、Python)の頭文字を取った略称です。
WordPressなど自分Web サイトの構築に適した環境です。
ここまでで、ある程度セキュリティ対策を施したRokeyLinux9の初期設定が終わっているので
LAMPの「L」は終了しています。
今回は、LAMPの「A」のApache環境を構築していきます。
Remi リポジトリのインポート
ApacheやPHPの最新バージョンを使用したい場合、Remi リポジトリのインストールが必要なようです。
https://www.linuxcapable.com/how-to-install-php-on-rocky-linux/
ここを参考にインストールしてみようと思いますが、Remi の前に、「crb」を有効にし「epel」のインストールが必要なようです。
その後、「remi」をインストールします。
# dnf config-manager --set-enabled crb
# dnf install https://dl.fedoraproject.org/pub/epel/epel-release-latest-9.noarch.rpm
# dnf install https://dl.fedoraproject.org/pub/epel/epel-next-release-latest-9.noarch.rpm
# dnf install dnf-utils http://rpms.remirepo.net/enterprise/remi-release-9.rpm
# dnf repolist
repo id                           repo の名前
appstream                         Rocky Linux 9 - AppStream
baseos                            Rocky Linux 9 - BaseOS
crb                               Rocky Linux 9 - CRB
epel                              Extra Packages for Enterprise Linux 9 - x86_64
epel-cisco-openh264               Extra Packages for Enterprise Linux 9 openh264 (From Cisco) - x86_64
epel-next                         Extra Packages for Enterprise Linux 9 - Next - x86_64
extras                            Rocky Linux 9 - Extras
remi-modular                      Remi's Modular repository for Enterprise Linux 9 - x86_64
remi-safe                         Safe Remi's RPM repository for Enterprise Linux 9 - x86_64
Apache(httpd)
このサイトでも、下記でcentOS7 にインストールしました。

httpdのインストール
前回同様に「httpd」「httpd-tools」「mod_ssl」をインストールし、
「httpd」を起動し、サーバを再起動しても自動的に起動するように設定します。
# dnf install httpd httpd-tools mod_ssl
# systemctl start httpd
# systemctl status httpd
● httpd.service - The Apache HTTP Server
     Loaded: loaded (/usr/lib/systemd/system/httpd.service; disabled; preset: disabled)
     Active: active (running) since Tue 2024-01-02 12:47:29 JST; 16s ago
       Docs: man:httpd.service(8)
・
・
# systemctl enable httpd
# systemctl is-enabled httpd
enabled
Firewalld に許可
前回、「ssh」接続用に管理ゾーンを新規作成しました。
ウェブサーバーは、全体に公開するため、ネットワークアダプタで許可している「public」ゾーンだけに「http」サービスの許可すればいいように思っていいましたが、管理ゾーンの「admin」のアドレスでも確認するので、両方に追加が必要でした。
さらに、後で「https」の設定を行う予定なので、こちらも許可しておきます。
# firewall-cmd --add-service=http --zone=public --permanent
# firewall-cmd --add-service=https --zone=public --permanent
# firewall-cmd --add-service=http --zone=admin --permanent
# firewall-cmd --add-service=https --zone=admin --permanent
success
# firewall-cmd --reload
# firewall-cmd --list-all --zone=public
public (active)
target: default
icmp-block-inversion: no
interfaces: eno1
sources:
services: dhcpv6-client http https
ports:
・
・
# firewall-cmd --list-all --zone=admin
admin (active)
target: default
icmp-block-inversion: no
interfaces:
sources: 192.168.0.100 192.168.0.101
services: cockpit dhcpv6-client http https ssh
ports:
・
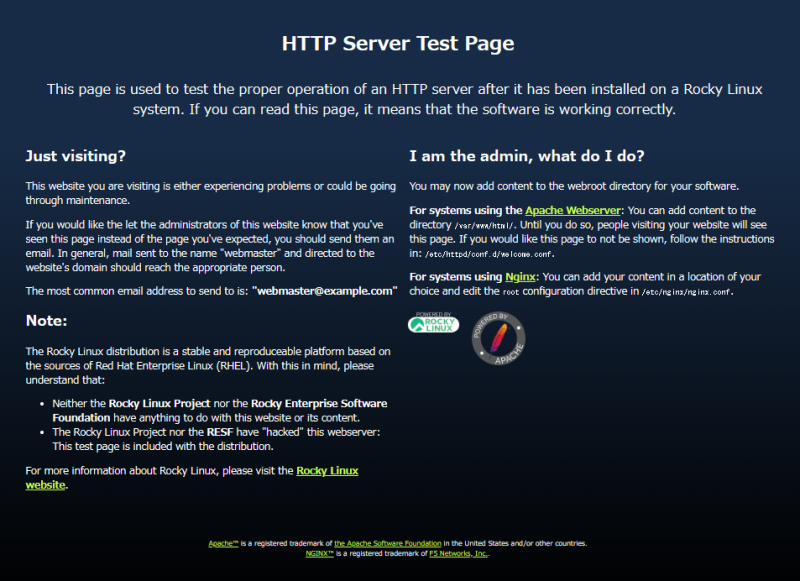
・Apacheの動作確認
これで、Apacheのインストールと、Firewalldは終了しています。
自宅LAN内の他のPCのアドレスバーにサーバのIPアドレスを入力すれば、
テストページが表示されるはずです。
例えば、アドレスバーに、http://192.168.1.101(サーバアドレス)と入力して
テストページが表示されれば正常に動作しています
自宅から外部からのアクセスを確認するには、スマホなどのwifi設定を一旦解除し、
LTE接続にしてブラウザのアドレスバーに自宅のグローバルIPアドレス入力で確認できます。
ただし、事前にゲートウェイのルータで、80番ポートを、このサーバーのIPアドレスへ転送するように設定しておく必要があります。
自宅のグローバルアドレスを知る方法はネット上に沢山あります。
例えば、下記サイトでも知る事ができます。
https://www.cman.jp/network/support/go_access.cgi
確認がすんだら、ルータ設定は、すぐに戻しましょう。
Apache設定ファイル・httpd.conf、変更
- 設定ファイルのバックアップ
- Webサーバー管理者メールアドレスの変更
- ホスト名の変更
- Webサーバーが公開するファイルを格納するディレクトリ
容量が大きくなる事を想定し、「/home」へ変更する - 公開ディレクトリのファイル一覧を制御させない
- 必要であれば、Webサーバがプログラムを実行するCGIの設定
デフォルト以外のディレクトリを使用する場合には、そのディレクトリを追加し
「Options」ディレクティブに「ExecCGI」機能を追加。
また、「AddHandler」で実行させたいスクリプトの拡張子を定義します。
# cd /etc/httpd/conf/
# cp -p httpd.conf httpd.conf.org
# vi ./httpd.conf
・
・
ServerAdmin root@localhost
↓
ServerAdmin root@hogehoge.com
・
・
# ServerName www.example.com:80
↓
ServerName www.hogehoge.com.com:80
・
・
DocumentRoot "/var/www/html"
↓
DocumentRoot "/home/www/html"
・
・
<Directory "/var/www/html">
↓
<Directory "/home/www/html">
・
・
Options Indexes FollowSymLinks
↓
Options  FollowSymLinks
・
・
#----- 2024.01.04 kazu      <----- CGIをデフォルト以外で使用する例
AddHandler cgi-script .cgi
<Directory /home/www/html/script>
  AllowOverride None
  Options ExecCGI FollowSymLinks
  Order allow,deny
  Allow from all
</Directory>
・
・
ドキュメントルートディレクトリの作成
Webに公開するコンテンツ格納ディレクトリを設定変更したので、
そのディレクトリを作成します。
# mkdir /home/www
# mkdir /home/www/html
# mkdir /home/www/cgi-bin
# chown apache.apache /home/www/html/
# chown apache.apache /home/www/cgi-bin/
# ls -la /home/www

# httpd -t
Syntax OK
セキュリティ対策追加
ちょっと、OSバージョンの違いもありますが、こちらを参考に設定してみました。
https://www.rem-system.com/apache-security01/
テストページが表示されないようにする
テストページは、「/etc/httpd/conf.d/welcome.conf」が表示させてるみたいで
コメントを読むと、表示させたくないなら、「#」を付けてコメントアウトしろとあります。
さらに、削除しても、アップグレードで復活するとあるので、バックアップしてコメントアウトしました。
さらに、http://ドメイン名/icons/ でも「icon」一覧が表示されたりするので
こちらも、コメントアウトにしました。
# cd /etc/httpd/conf.d
# cp -p welcome.conf welcome.conf.org
# cp -p  autoindex.conf  autoindex.conf.org
# vi ./welcome.conf
・
・
#<LocationMatch "^/+$">
#    Options -Indexes
#    ErrorDocument 403 /.noindex.html
#</LocationMatch>

#<Directory /usr/share/httpd/noindex>
#    AllowOverride None
#    Require all granted
#</Directory>
・
・
・
# vi autoindex.conf
・
・
#Alias /icons/ "/usr/share/httpd/icons/"
#<Directory "/usr/share/httpd/icons">
#    Options Indexes MultiViews FollowSymlinks
#    AllowOverride None
#    Require all granted
#</Directory>
・
・
・
# systemctl restart httpd
httpd を再起動すると、表示されなくなりました。
telnet インストール
「telnet」は、ネットワークを介して通信を行うソフトウェアです。
「telnet」を利用する事で、いろいろなポートへのアクセス確認ができます。
これから、HTTPの状況を確認するのに使用するので、まずはインストールします。
# dnf install telnetApacheバージョン情報とTRACEメソッドOFF
現在の状態を調べてみます。
$ telnet localhost 80
Trying ::1...
Connected to localhost.
Escape character is '^]'.
OPTIONS / HTTP/1.1        <-------入力
host:localhost            <-------入力
                            <-------「Ebter」キー
HTTP/1.1 200 OK
Date: Wed, 02 Jan 2024 11:30:54 GMT
Server: Apache/2.4.57 (Rocky Linux) OpenSSL/3.0.7 <---- Apacheバージョン情報
Allow: OPTIONS,HEAD,GET,POST,TRACE
Content-Length: 0
Content-Type: httpd/unix-directory

Connection closed by foreign host.
「 Escape character is ‘^]’. 」の入力待ち後に、
「OPTIONS / HTTP/1.1」「host:localhost」「enter」を入力する必要があります。
「Apache情報」と「TRACE」が有効になっているのがわかります。
セキュリティ的に「無効」にしたほうがいいとの事なので、無効にします。
「/etc/httpd/conf/httpd.conf」の最後に
「ServerTokens ProductOnly」
「ServerSignature off」
「TraceEnable off」を追加。
Apacheを再起動後、再度確認します
# vi /etc/httpd/conf/httpd.conf <------ 編集開始
・
・
##--- Hogehoge added. 2024/01/03  <------ コメントで日付など残しておくと便利
ServerTokens ProductOnly      <------ Apache情報設定 追加
ServerSignature off
TraceEnable off               <------ TRACE無効 追加
                              <------ 保存
・
# httpd -t
Syntax OK
# systemctl restart httpd    <--- 再起動
# telnet localhost 80        <--- telnet
Trying ::1...
Connected to localhost.
Escape character is '^]'.
OPTIONS / HTTP/1.1  <----- 入力
host:localhost       <----- 入力
                       <---「Enter」キー
HTTP/1.1 200 OK
Date: Wed, 03 Jan 2024 11:38:54 GMT
Server: Apache                   <----- バージョン情報なし
Allow: OPTIONS,HEAD,GET,POST   <--------- TRACE が消えている
Content-Length: 0
Content-Type: httpd/unix-directory

Connection closed by foreign host.
X-Frame-Optionsヘッダ設定
「mod_headers」機能が有効になっているかの確認をします。
「/etc/httpd/conf.modules.d/00-base.conf」で記載があるか?有効か?の確認をします。
記載があり、コメントになっていなければ、有効になっています。
# cat /etc/httpd/conf.modules.d/00-base.conf | grep mod_headers.so
LoadModule headers_module modules/mod_headers.so
「/etc/httpd/conf/httpd.conf」の最後に
「 Header append X-FRAME-OPTIONS “SAMEORIGIN” 」
を追加し、Apacheを再起動し、telnetで確認します
# vi /etc/httpd/conf/httpd.conf <------ 編集開始
・
・
##--- Hogehoge added. 2024/01/03  <----- 情報としてコメントを付けおく
ServerTokens ProductOnly
ServerSignature off
TraceEnable off
Header append X-FRAME-OPTIONS "SAMEORIGIN" <----- 追加
                                                 <----- 保存
・
# systemctl restart httpd    <---- 再起動
# telnet localhost 80        <---- telnet
Trying ::1...
Connected to localhost.
Escape character is '^]'.
OPTIONS / HTTP/1.1  <-----入力
host:localhost      <-----入力
                     <「Enter」キー
HTTP/1.1 200 OK
Date: Sat, 03 Dec 2024 12:03:26 GMT
Server: Apache
Allow: GET,POST,OPTIONS,HEAD
X-FRAME-OPTIONS: SAMEORIGIN    <---- 有効
Content-Length: 0
Content-Type: httpd/unix-directory

Connection closed by foreign host.
ドキュメントルートにindex.htmlを作成
上記でドキュメントルートを変更し、新しく作成したので、
デフォルトのトップページ「index.html」を作成しておきます。
保存後、ファイルの所有者を「Apache」のユーザー「apache」に変更し再起動しておきます。
$ cd /home/www/html/
# vi ./index.html
・
<html>
  <body>
    <h1>This website is currently under maintenance.</h1>
  </body>
</html>
・
    <-----------保存
# chown -R apache.apache /home/www/html/
# httpd -t
Syntax OK
# systemctl restart httpd
自宅LAN内から、ブラウザのアドレスバーに、このサーバーのIPアドレスを入力するとこのページが表示されます。

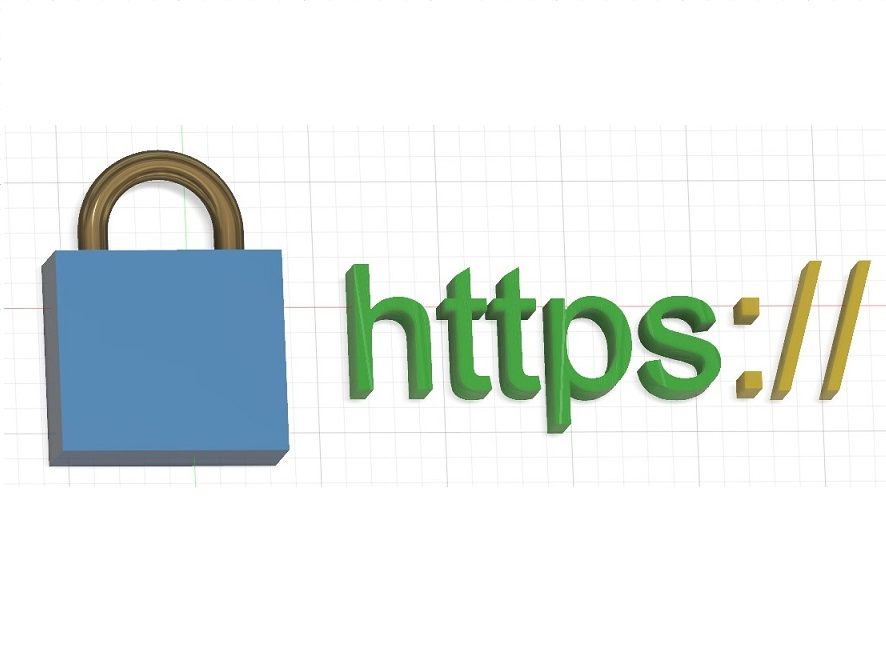
Let’s Encrypt証明書でhttps化
上の画像でも確認できますが、最近は「http://」では「保護されていない通信」警告が表示されてしまいます。
「https化」は必須ですね。
ただし、https://はホスト名でのアクセスが必要になります、自宅のサーバーを公開するには、独自ドメインとDNSサーバーが必要になります。
このサイトのドメインはこちらで取得しました
独自ドメインの取得と管理は若干のコストがかかりますが、DNS管理は無料のサービスもあります。
ドメイン取得と「https化」の記事は、下記でも紹介しています。
ファイヤーウォール設定の確認
Firewallサービスで「https」を許可している必要があります。
上記ですでに設定済みですが、再度確認してみます。
# firewall-cmd --get-active-zones
admin
  sources: 192.168.0.100 192.168.0.101
public
  interfaces: eno1
# firewall-cmd --list-all --zone=public | grep services
  services: dhcpv6-client http https
# firewall-cmd --list-all --zone=admin | grep services
  services: cockpit dhcpv6-client http https ssh
「adminゾーン」と「publicゾーン」へ許可されています。
sslモジュールの確認
こちらも、「httpdのインストール」時に、追加インストールしましたが、確認してみます。
#  dnf list installed | grep mod_ssl
mod_ssl.x86_64  1:2.4.57-5.el9 @appstream
# httpd -M | grep ssl
ssl_module (shared)
登録されていました。
Certbot クライアントのインストール
Let’s Encrypt は、クライアントソフトウェア「Certbot」を使用することで、SSL/TLS サーバ証明書の取得・更新作業を自動化できる仕組みになっています。
まずは、パッケージが用意されているか確認してみます。
# dnf list --all | grep certbot
certbot.noarch  2.6.0-1.el9  epel
・
・
EPELリポジトリに含まれていました。
Let’s Encrypt総合サイト情報を参考にインストールします。
# dnf install certbot
# dnf install python-certbot-apache
・
# dnf list installed | grep certbot      <----------- インストール確認
certbot.noarch                2.6.0-1.el9   @epel
python3-certbot.noarch        2.6.0-1.el9   @epel
python3-certbot-apache.noarch 2.6.0-1.el9   @epel
・
# which certbot         <---------- インストール場所の確認
/usr/bin/certbot
インストールは完了しました。
certbot で証明書発行
certbotには、いくつかのプラグインがありますが、すでにWebサーバーが動作している場合には「webroot プラグイン」が使えます。
これは、Webサーバーの動作を変更する必要はないですが、外部からサーバーの80番ポートにアクセスできる必要があります。
Webサーバーが動作していない場合には、「Standaloneプラグイン」が使えます。
ただし、もし動作している場合には、停止しておく必要があります。
今回は、「webroot プラグイン」でやってみます。
追加するオプションは、「certonly」「–webroot」に「-w」オプションで、証明書ファイルを保存するディレクトリ、「-d」で証明書を適応するホスト名を指定します。
# certbot certonly --webroot -w /home/www/html/ -d www.hogehoge.com -d hogehoge.com
Saving debug log to /var/log/letsencrypt/letsencrypt.log
Enter email address (used for urgent renewal and security notices)
 (Enter 'c' to cancel):      <------自分のEメールアドレスを入力

- - - - - - - - - - - - - - - - - - - - - - - - - - - - - - - - - - - - - - - -
Please read the Terms of Service at
 https://letsencrypt.org/documents/LE-SA-v1.3-September-21-2022.pdf. You must
agree in order to register with the ACME server. Do you agree?
- - - - - - - - - - - - - - - - - - - - - - - - - - - - - - - - - - - - - - - -
(Y)es/(N)o: y <----- 利用規約を読んでください

- - - - - - - - - - - - - - - - - - - - - - - - - - - - - - - - - - - - - - - -
Would you be willing, once your first certificate is successfully issued, to
share your email address with the Electronic Frontier Foundation, a founding
partner of the Let's Encrypt project and the non-profit organization that
develops Certbot? We'd like to send you email about our work encrypting the web,
EFF news, campaigns, and ways to support digital freedom.
- - - - - - - - - - - - - - - - - - - - - - - - - - - - - - - - - - - - - - - -
(Y)es/(N)o: y  <--------- 電子フロンティア財団からEメールが届いてもいいか?
Account registered.
Requesting a certificate for www.hogehoge.com and hogehoge.com

Successfully received certificate.
Certificate is saved at: /etc/letsencrypt/live/www.hogehoge.com/fullchain.pem
Key is saved at:         /etc/letsencrypt/live/www.hogehoge.com/privkey.pem
This certificate expires on 2024-01-03.
These files will be updated when the certificate renews.
Certbot has set up a scheduled task to automatically renew this certificate in the background.

- - - - - - - - - - - - - - - - - - - - - - - - - - - - - - - - - - - - - - - -
If you like Certbot, please consider supporting our work by:
 * Donating to ISRG / Let's Encrypt:   https://letsencrypt.org/donate
 * Donating to EFF:                    https://eff.org/donate-le
- - - - - - - - - - - - - - - - - - - - - - - - - - - - - - - - - - - - - - - -
無事に証明書をGETできました!
証明書は3か月で更新になります。
更新は、「certbot」の「renew」で行いますが、「–dry-run」をつける事で確認できます。
# certbot renew --dry-run
Saving debug log to /var/log/letsencrypt/letsencrypt.log

- - - - - - - - - - - - - - - - - - - - - - - - - - - - - - - - - - - - - - - -
Processing /etc/letsencrypt/renewal/www.hogehoge.com.conf
- - - - - - - - - - - - - - - - - - - - - - - - - - - - - - - - - - - - - - - -
Simulating renewal of an existing certificate for www.hogehoge.com and hogehoge.com

- - - - - - - - - - - - - - - - - - - - - - - - - - - - - - - - - - - - - - - -
Congratulations, all simulated renewals succeeded:
  /etc/letsencrypt/live/www.hogehoge.com/fullchain.pem (success)
- - - - - - - - - - - - - - - - - - - - - - - - - - - - - - - - - - - - - - - -
「Congratulations」で、更新可能の確認ができました。
SSLサーバ証明書の設定
発行してもらった証明書を、設定ファイルに反映させます
「/etc/httpd/conf.d」内の「ssl.conf」を編集します
$ cd /etc/httpd/conf.d
$ sudo cp -p ssl.conf ssl.conf.20240103  <---- バックアップしておく
$ sudo vi ./ssl.conf
・

#SSLCertificateFile /etc/pki/tls/certs/localhost.crt
SSLCertificateFile /etc/letsencrypt/live/www.hogehoge.com/fullchain.pem
・
・
#SSLCertificateKeyFile /etc/pki/tls/private/localhost.key
SSLCertificateKeyFile /etc/letsencrypt/live/www.hogehoge.com/privkey.pem
・
・
・                 <--- 保存
$ sudo httpd -t
Syntax OK

$ sudo systemctl restart httpd
$ sudo systemctl status httpd
https:// でのアクセス確認
https://ドメイン名 でアクセスできるかの確認をします。
外部からの確認は、ルータの443ポートを通しておくと確認できますが、
同じLAN内でのPCでは、「hosts」ファイルを編集する事で可能になります
WindowsPCであれば、「C:\Windows\System32\drivers\etc\hosts」
linux であれば、「/etc/hosts」を編集します
192.168.1.101 www.hogehoge.comこれで、ローカル内であっても、「https://ドメイン名」でアクセス可能になります。
ApacheでHTTP/2を利用する
HTTP/2 を利用するには、次の環境が必要になります
参考:https://www.value-domain.com/media/http2/
・通信の暗号化が必須で、SSLサーバー証明書が必要です。
・マルチスレッド機能であるeventMPMが有効である事
eventMPMモジュールとhttp2モジュールの確認
eventMPMとhttp2モジュールは、RockyLinux9ではデフォルトで有効になっているようです。
確認してみます。
# httpd -M | grep mpm
 mpm_event_module (shared)
# httpd -M | grep http2
 http2_module (shared)
 proxy_http2_module (shared)
有効になっていました。
http2を有効にする
参考:Red Hat Customer Portal
まず、現状を確認してみます。
筆者は、Google Chrome で確認してみました。
Chromeを起動後、「F12」を押すと、表示されたWebページの横に
開発ツールのページが表示されます。
ここで、確認したい「https://www.hogehoge.com」のページを表示すると
「Network」タブの「Protocol」で確認できます。
「https://」でのアクセスになるので、IPアドレスではなくドメインになります。
ここでもし、「Name・・・Protocol」の表が出ていない場合には、「Ctrl」+「R」で
再読み込みすると、出てきます。

私の環境では、「http/1.1」で通信しているのが分かります。
ここで、参考ページを参考に、設定しようと思います。
仮想ホスト ごとに、設定する場合、<VirtualHost>ディレクティブの下の行で設定するようですが、全てのサーバーで有効にするには、メインの設定ファイル「httpd.conf」に追加するようです。
特に今回の私の環境は、仮想ホスト設定にはしていないので、メインで設定します。
# vi /etc/httpd/conf/httpd.conf
・
・
##----- added. 2024/01/03
<IfModule http2_module>
    Protocols h2 http/1.1
    ProtocolsHonorOrder on
</IfModule>
・
# systemctl restart httpd
最終行に、追加しまし、再起動しました。
再度、Chromeで確認してみます。
「http/1.1」から変化がない場合には、
Chromeの場合では、「Ctrl」+「Shift」+「Delete」で閲覧履歴データを削除し
ブラウザでページを表して「F12」で確認します。
「Protocol」が表示されていない場合には、「CTRL」+「R」やキャッシュ削除してみてください。
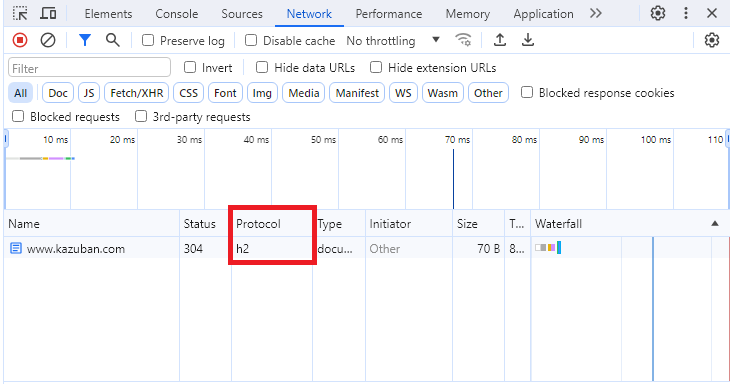
「h2」となっている事から、http2 で通信されている事が確認できます。